Unraid
Contributed by: guniv
Setting up CoolerControl in Unraid is fairly straightforward but does require a little manual work to make sure it's working correctly. This tutorial will walk through setting it up.
Prerequisites
There is some setup required to get the full functionality of CoolerControl on Unraid.
Enabling hard drive temperature reporting
CoolerControl relies on the Linux Hardware Monitoring kernel API (hwmon) to collect information like sensor temperatures from the system. By default, SATA devices like hard drives do not have their temperatures reported to hwmon. Enabling this in Unraid is simple: open the Unraid terminal and enter the command sudo modprobe drivetemp.
WARNING
On some systems running drivetemp can prevent drives from spinning down and may cause other issues. If the system becomes unstable, try running CoolerControl without enabling drivetemp. There is also an issue with drivetemp on Unraid versions lower than 7.0.1 due to a bug in the Linux kernel.
This command has to be run every time the system is rebooted. To do this, use the User Scripts plugin from Andrew Zawadzki. In User Scripts, add a new script, and then edit the script to include that command:

Save the script, and then edit the schedule for the script to run on first array start.

Confirm fans are visible to Unraid
To check if fans are already visible to Unraid, install the Dynamix System Temp plugin from Bergware. In the settings for this plugin, it is possible to select which fan is shown on the Unraid dashboard footer.

If no fans are available under the Array fan speed menu, it means the system fans are not currently visible to Unraid.
A potential fix for this is drivers from Community Applications. The ITE IT87 Driver from ich777 has worked for others in making the fans available. The Nuvoton NCT6687 Driver from ich777 may also work.
Last resort: editing a kernel boot parameter
A more extreme measure that may make fans available to Unraid involves editing the kernel boot parameter acpi_enforce_resources. This option is normally set to strict, but editing it to lax may allow the system to access hardware that is also claimed by the system's Advanced Configuration and Power Interface.
CAUTION
Making this change can cause system instability. Read and follow the instructions below carefully to ensure the system can be recovered if an issue arises, and always make sure to have system backups, including the boot USB drive.
On the Unraid server, go to the Main tab and click on Flash under Boot Device to access the boot USB's settings.
Scroll down on the page to the Syslinux Configuration section. On the top right of the section, select the toggle to change from Menu View to Raw View.
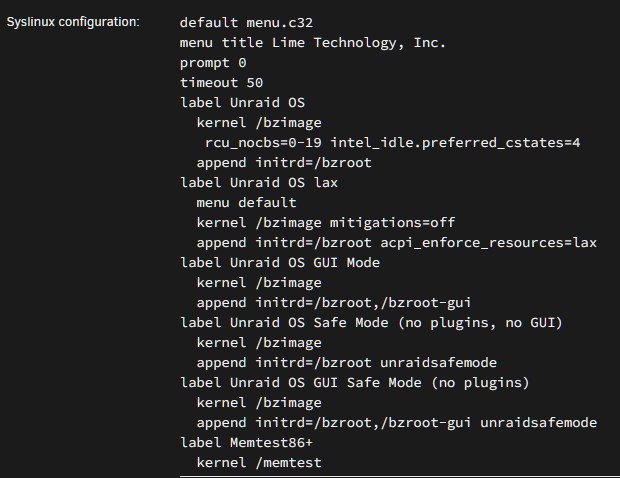
This section defines the set of options that appear when booting the Unraid system. The configuration below is just an example and may be different on each system.

Edit this configuration by copying the default label Unraid OS section and pasting it again underneath before the next label. Then, add acpi_enforce_resources=lax after append initrd=/bzroot. Remove menu default from the original Unraid OS and rename the new section to something like Unraid OS lax. This name will be how it appears when the system is booting.
Apply the changes and once again select the toggle to change from Raw View to Menu View.
Make sure the new option created appears and is selected and highlighted, which indicates it will be the default boot option.
Next, reboot the system and ensure the new option is the default selection when booting the system.

Make sure the system boots correctly. If it does not boot correctly, reboot the server and select the original Unraid OS option. Make sure in the Flash settings that this option is set back to default. This should also be done if the new setting does not successfully expose the fans to Unraid.
Nvidia GPU support
To add Nvidia GPUs to CoolerControl, the Nvidia-Driver plugin from Community Applications needs to be installed and the plugin must be used to install a Nvidia driver on the system.
If these are installed, Nvidia GPUs will be able to show up in CoolerControl. See the Nvidia section below for information on how to set this up.
If using the Nvidia powersaving script by SpaceInvaderOne it may interfere with this container. See the Issues with Nvidia powersaving section below for how to fix this.
Initial CoolerControl setup
Search for CoolerControl in Community Applications and select Install.
The Unraid template has three settings by default: the configuration storage, the WebUI port, and read-only access to hwmon on the Unraid system.

The CoolerControl configuration host path can be changed to store it somewhere else if needed, and the port can be changed if it conflicts with another container.
Adding Nvidia GPUs
WARNING
There is currently no way to control Nvidia GPU fans without leaving the container in privileged mode, and it is not recommended to leave the container in privileged mode.
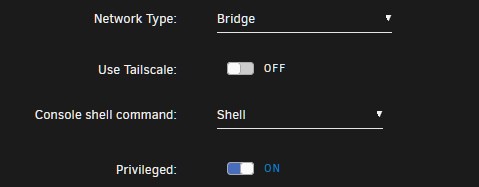
To add Nvidia GPUs to CoolerControl, change Basic View to Advanced view in the top right of the Add Container or Update Container page when configuring the container.

Next, edit the Extra Parameters section to add --runtime=nvidia --gpus=all.

If using the Nvidia powersaving script by SpaceInvaderOne it may interfere with this container. See the Issues with Nvidia powersaving section below for how to fix this.
Privileged mode
WARNING
It is not recommended to leave the container in privileged mode, and it should be disabled after setup of the container has been finished.
While following this tutorial and while performing initial setup on the container, run it in privileged mode. This gives the container unrestricted access to the Unraid system, which will allow CoolerControl to discover any available devices on the system.
Hit apply to download and run the container.
Checking devices in CoolerControl
Now that CoolerControl is running, go to Unraid's Docker tab and click on the icon next to CoolerControl, and click on WebUI to open CoolerControl itself.

On first run, CoolerControl will walk through a basic introduction of how to use it.

After this introduction, check the devices that are available in CoolerControl. Each device should have a variety of sensors for temperature, frequency, load, power, and more.

Checking devices for hwmon
Check each device to see if it's being exposed by hwmon, which is already mounted to the container. The CPU sensors should be provided by hwmon. Click on the ⓘ next to the device (labeled Device Details) and look at the locations.

The first location is /sys/class/hwmon/hwmon2 which is being mounted to the container under hwmon. This means that this device is already being provided to the container regardless of whether privilged mode is on or not.
Check each device and see if it is being provided by hwmon by checking under Locations.
Example: adding an LED controller
In this example system, CoolerControl is also discovering an LED controller built into the motherboard.

Under locations, the LED controller is identified at /dev/hidraw4. Because it is not provided by hwmon, it needs to be manually added to the container in Unraid. Return to the docker tab of Unraid and edit the container.

In the Update Container screen, scroll to the bottom and select Add another Path, Port, Variable, Label, or Device. In the Add Configuration menu, set the Config Type to Device, because the device is located in /dev, which means it is a device. Add the path listed in CoolerControl, and name the device accordingly.

Save this configuration and apply it to the container. This will update the container so that the LED controller will show up even if privileged mode is turned off.
Example: adding fan controls
On CoolerControl, find the device that is exposing the fans to the container. In this example, the fans are exposed under it8689. Notice that the locations does include hwmon.
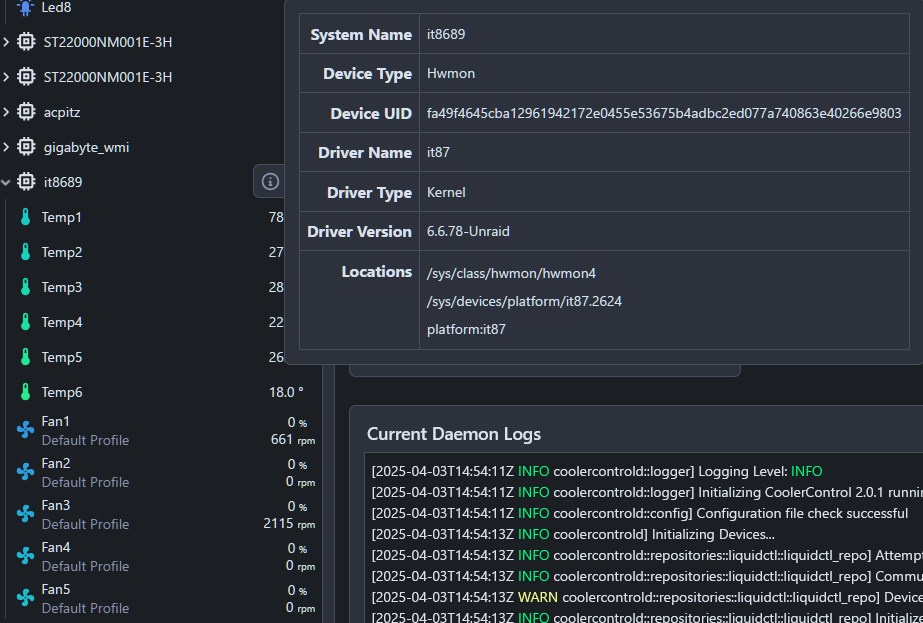
However, because hwmon is mounted as read-only in the container, the fan speed can not be controlled if the container is not run in privileged mode. To get around this, the fan directory can be directly mounted in the Unraid container with read-write permissions. Return to the docker tab of Unraid and edit the container.
In the Update Container screen, scroll to the bottom and select Add another Path, Port, Variable, Label, or Device. In the Add Configuration menu, keep the Config Type on Path. Add the second path listed in CoolerControl's locations, and name the device accordingly.

Save this configuration and apply it to the container. This will update the container so that the fans are controllable even if privileged mode is turned off.
Finalizing device setup
Once the devices have been checked and set up in the Unraid Update container screen, edit the container a final time to turn off privileged mode. Once privileged mode is off, open CoolerControl and check that all of the devices still appear, and that devices like fans can be controlled. Fans can be checked by setting them to manual and adjusting the fan speed.

If no error appears when applying the new fan speed, the configuration is working.
IMPORTANT
There is currently no way to control Nvidia GPU fans without leaving the container in privileged mode, and it is not recommended to leave the container in privileged mode.
Troubleshooting
Issues with nct6687 drivers
In some cases, Unraid may see devices using the nct6687 driver that is built-in to the Linux kernel but not be able to control them. Using the Nuvoton NCT6687 Driver from ich777 from Community Applications will likely work. If using the Nuvoton driver, make sure in Dynamix System Temp that the Available Drivers option does NOT include nct6683 even if it is detected and available. These drivers will conflict and interfere with each other.
Controlling Nvidia GPU fans
There is currently no way to control Nvidia GPU fans without leaving the container in privileged mode, and it is not recommended to leave the container in privileged mode.
Issues with Nvidia powersaving
The Nvidia powersaving script by SpaceInvaderOne will stop the coolercontrold process used by this container if no other Docker containers are using the GPUs. To fix this, use this revised script that specifically carves out an exception for coolercontrold.
"Unable to set PWM value" and/or fan not staying on curve
If CoolerControl is encountering this error or the fans won't stay at a speed to match the set curve, the system's BIOS settings may be interfering with CoolerControl. The fix will vary from BIOS to BIOS but it is recommended to set the system fans at full speed in the system BIOS.
Slow HWMon Device detected
The "Slow HWMon Device detected" error may be detected when Unraid spins disks down depending on the settings. This error can usually be safely ignored but may require attention in some scenarios.
Known issues
Hard drive spin down temperatures
In CoolerControl versions earlier than 2.2.0, the last known temperature of a hard drive being reported to hwmon by drivetemp that has been spun down will only report the last known temperature of the device. This may impact a configuration that has a curve based on the drive speeds. For instance, fans could continue to run at a high speed if the drive spins down while running warm. Version 2.2.0 added support in the settings under "Daemon" to detect drive power state.